
Lego WeDo
So, Ben is in a Lego robotics class at his school where they’re using the Lego WeDo kits to do a little exploration of robotics at an early elementary level. I’ve been helping in the class a bit, since I’m the ‘person most likely to know how to program these things’ of the people who could help out.
The kits are much smaller than the NXT/mindstorm ones, they’re just about 150 pieces of technic and ordinary legos plus a USB hub, motor, IR distance sensor, and tilt sensor. Also unlike the NXT systems, it only works when connected to the computer. The good part is that you’ve got all the programming capability of a computer to use, the bad part is that it’s a really strange environment. (and there’s a pesky usb cable, which amazingly enough, tends to trigger the distance sensor). There’s a kids instruction book in the kit, which is essentially similar to any other lego instruction book, it tells you how to build the kit, but not what to do with it at the end. There’s a good chunk of stuff in the teacher’s guide, some of it having to do with the programming, and some with other activities with less direct connections to the robotics theme.
The programming environment is described as ‘iconic’, fitting in with the general tone of lego instructions. It’s strange, and a little unclear as to what all the functions really are. It gets a little better if you can read the docs, and see the explanation of what the icons mean in the teacher’s guide, but that’s not in the kids’ books. It’s also not internally consistent. The ‘run motor for x time’ block takes a number, and that number is apparently in 1/10 of a second. It’s not clear from the context, I found that online somewhere in a discussion of how some of the items work. The delay block also takes a number, but it delays in full seconds.
Finally, and most importantly, it’s not clear how to branch. The programs are linear, with loops and delays, but nothing that looks like an if statement. There is no obvious conditional or branch. In a way, that makes sense if you can have a bunch of event based triggers that are easily tied to the sensor readings, but that’s also a bit tricky. (It can be done, and there are at least two ways of doing it. One way is to send a message, and receive it multiple times, the other would be to have the same keypress event start all the threads, then in each case have an infinite loop with a delay on the sensor condition as the first item in the thread. I say thread because they’re lines of blocks that look like threads, not that they’re actual threads). The actual projects in the class don’t really explore any sort of conditional behavior, they’re more in line with triggering some action on a sensor response. That may have something to do with the limitations on the programming environment.
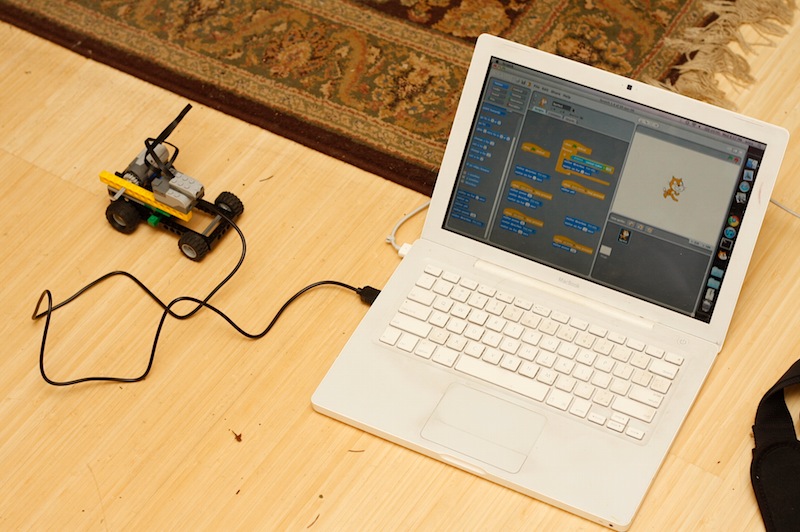
Thankfully, there’s a solution: Scratch. Scratch has built in support for the motor and sensors in the 1.4 version. And Ben started playing with it a bit over Christmas break, so he’s already somewhat familiar with it. It’s got conditionals, words that explain the functions, and units on the numbers. When the motor block says run for x seconds, you know what you’re getting. Though, the directions “this way” and “that way” are a bit… relative.
I’m interested in pushing this a bit beyond what’s in the class, which seems to focus way more on the building part and less on the possibilities for interesting behavior. So, I’ve borrowed a hub, motor, and sensors to see what can be done at home. The criteria are tight, as you can really only run one motor and one sensor at a time. You can hook two sensors and a motor up, but one of the sensors gets very erratic and noisy when that happens. Additional USB hubs could be used, but there are still issues running more than one motor at a time. So, there are tight constraints.
Looking for ideas that would be interesting to build and play with, we settled on a robotic car. The motor will drive the rear wheels, and in a nod to the cheapest sorts of radio control cars, we’re going to try to make the front wheels turn the car in reverse, so that it can theoretically avoid obstacles in its path. So far though, it can drive forward and backward (in a straight line) when the arrow keys are pressed, and if something gets in the way of the sensor, it backs up for 2 seconds. Ben added code to make it go faster when the up arrow is pressed, and stop on the down arrow. He has plans to work with it for the next couple of days.
(I also saw the 2 wheel balancing robot on the MIT Scratch/WeDo page. That would be fun to try to, but perhaps when we have a better handle on the drivetrain)
This makes me want to get an arduino and interface it to a real radio control car. It wouldn’t be _that_ hard. Tim’s uses 4 wires for driving two motors, but I’d probably want something a bit more robust than that one.
