
Archive for the 'Programming' Category
Pillow compilation failure on OSX 10.9.2
For those of you installing Pillow/PIL on the latest version of Mavericks, 10.9.2, using XCode 5.1, it’s going to fail with this error:
clang: error: unknown argument: '-mno-fused-madd'
There is a thread with a workaround (Unable to install on OS X 10.9.2 due to unsupported compiler flags:-mno-fused-madd) on GitHub. It would be nice if Google linked it a little more prominently.
No commentsPi day
It’s Pi day. My poor little raspberry pi is hanging out, finally connected to the controller board for the chicken coop door. It’s only waiting on a final enclosure and some programming. And then the poor pi will be shown to the coop and left there to sit. And raise the door. And lower the door. It’s probably going to sound like the bored computer from Hitchhiker’s Guide to the Galaxy.
No commentsiOS 6
Just updated to iOS 6 on the iPad. Nice enough, except…. Maps.
Langley is not on Hat island, and it doesn’t take over an hour and two ferries to get there from Freeland.


Dear Apple…
The first rule of backups is to have one.
The second rule of backups is to never delete the most recent backup.
Rewind to this morning, I see this:

What this doesn’t say, in large red letters is “WARNING LARKS VOMIT THIS WILL DELETE YOUR BACKUP!”, it says that it will “remove your existing backup history”.
This is inherently a bad thing, though I didn’t realize it at the time, I really should have just copied that sparse bundle on the disk before letting Time Machine destroy 400 GB of backups. I’d like to point out that there was something like 1.3 TB of space on the drive, so there was no space pressure — it could have easily had an extra copy.
Because, first the delete failed. Apparently it takes a lot longer than expected to delete 400GB. Then, the new backups took forever. Like 1G/hr. On par with my net upload speed. And the computer was being narcoleptic for minutes at a time.
You know why you never want that little window when you don’t have a backup, even one that’s not with ‘improved reliability’?

(click to expand, or just guess)
“This disk has a hardware problem and can’t be repaired. Backup as much data as possible and replace the disk”
Thanks.
I could have used some of those 400 gigs of backups, because odds are, I’d probably be able to salvage more than I’m getting now, at a few hundred K per second.
Update: radar bug rdar://9215019
No commentsNot exactly obvious: Lighttpd + fast-cgi
According to the lightroom docs, if you are using a config like this:
  fastcgi.server = ( ".php" =>
      (( "socket" => "/tmp/php-fastcgi.socket",
          "bin-path" => "/usr/bin/php-cgi",
          "max-procs" => 10,
          "bin-environment" => (
              "PHP\_FCGI\_CHILDREN" => "16",
              "PHP\_FCGI\_MAX\_REQUESTS" => "1000"
          ),
          "broken-scriptfilename" => "enable"
      ))
  )
you will have (following the famous formula):
num-procs = max-procs * ( 1 + PHP\_FCGI\_CHILDREN )
10 * (16 + 1) = 170 procs
This is perhaps not what you want, especially since the php instances will slowly increase their memory high water marks and not release memory until they will generally all have processed your most memory intensive script, at which point you will have probably run out of memory in a manner similar to what apache will usually do for you out of the box.
If you’re using an opcode cache, you want one process, to allow one cache to be shared amongst all the child processes. (apparently, according to the google. I’m checking now). If you do have php children set, you don’t want 1, as that will have one controlling process and one child process, for a nice waste of space. My impression is that you want either max processes = 1 or max children = 1, and let the other float such that processes * max memory is less than your ram.
No commentsLego WeDo
So, Ben is in a Lego robotics class at his school where they’re using the Lego WeDo kits to do a little exploration of robotics at an early elementary level. I’ve been helping in the class a bit, since I’m the ‘person most likely to know how to program these things’ of the people who could help out.
The kits are much smaller than the NXT/mindstorm ones, they’re just about 150 pieces of technic and ordinary legos plus a USB hub, motor, IR distance sensor, and tilt sensor. Also unlike the NXT systems, it only works when connected to the computer. The good part is that you’ve got all the programming capability of a computer to use, the bad part is that it’s a really strange environment. (and there’s a pesky usb cable, which amazingly enough, tends to trigger the distance sensor). There’s a kids instruction book in the kit, which is essentially similar to any other lego instruction book, it tells you how to build the kit, but not what to do with it at the end. There’s a good chunk of stuff in the teacher’s guide, some of it having to do with the programming, and some with other activities with less direct connections to the robotics theme.
The programming environment is described as ‘iconic’, fitting in with the general tone of lego instructions. It’s strange, and a little unclear as to what all the functions really are. It gets a little better if you can read the docs, and see the explanation of what the icons mean in the teacher’s guide, but that’s not in the kids’ books. It’s also not internally consistent. The ‘run motor for x time’ block takes a number, and that number is apparently in 1/10 of a second. It’s not clear from the context, I found that online somewhere in a discussion of how some of the items work. The delay block also takes a number, but it delays in full seconds.
Finally, and most importantly, it’s not clear how to branch. The programs are linear, with loops and delays, but nothing that looks like an if statement. There is no obvious conditional or branch. In a way, that makes sense if you can have a bunch of event based triggers that are easily tied to the sensor readings, but that’s also a bit tricky. (It can be done, and there are at least two ways of doing it. One way is to send a message, and receive it multiple times, the other would be to have the same keypress event start all the threads, then in each case have an infinite loop with a delay on the sensor condition as the first item in the thread. I say thread because they’re lines of blocks that look like threads, not that they’re actual threads). The actual projects in the class don’t really explore any sort of conditional behavior, they’re more in line with triggering some action on a sensor response. That may have something to do with the limitations on the programming environment.
Thankfully, there’s a solution: Scratch. Scratch has built in support for the motor and sensors in the 1.4 version. And Ben started playing with it a bit over Christmas break, so he’s already somewhat familiar with it. It’s got conditionals, words that explain the functions, and units on the numbers. When the motor block says run for x seconds, you know what you’re getting. Though, the directions “this way” and “that way” are a bit… relative.
I’m interested in pushing this a bit beyond what’s in the class, which seems to focus way more on the building part and less on the possibilities for interesting behavior. So, I’ve borrowed a hub, motor, and sensors to see what can be done at home. The criteria are tight, as you can really only run one motor and one sensor at a time. You can hook two sensors and a motor up, but one of the sensors gets very erratic and noisy when that happens. Additional USB hubs could be used, but there are still issues running more than one motor at a time. So, there are tight constraints.
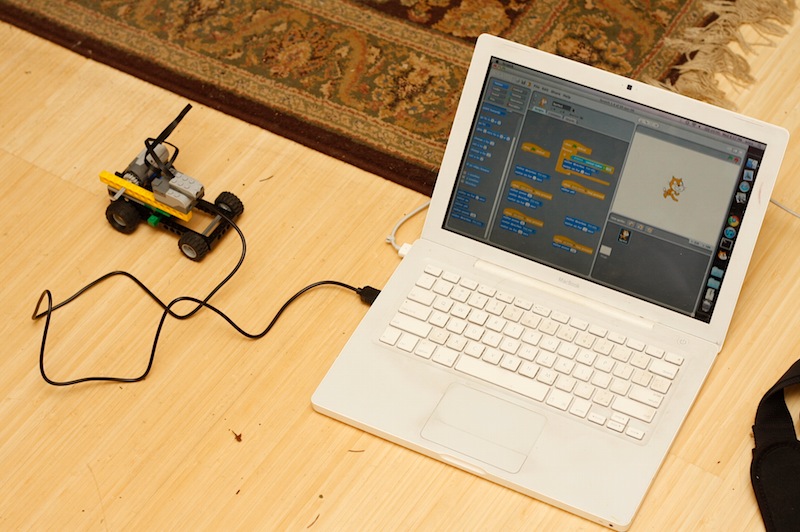
Looking for ideas that would be interesting to build and play with, we settled on a robotic car. The motor will drive the rear wheels, and in a nod to the cheapest sorts of radio control cars, we’re going to try to make the front wheels turn the car in reverse, so that it can theoretically avoid obstacles in its path. So far though, it can drive forward and backward (in a straight line) when the arrow keys are pressed, and if something gets in the way of the sensor, it backs up for 2 seconds. Ben added code to make it go faster when the up arrow is pressed, and stop on the down arrow. He has plans to work with it for the next couple of days.
(I also saw the 2 wheel balancing robot on the MIT Scratch/WeDo page. That would be fun to try to, but perhaps when we have a better handle on the drivetrain)
This makes me want to get an arduino and interface it to a real radio control car. It wouldn’t be _that_ hard. Tim’s uses 4 wires for driving two motors, but I’d probably want something a bit more robust than that one.

Slicehost
Round about mid-November, email sorta blew up here. It took a good weekend of not so spare spare time to get it sorta back working, including some horrific hacks that really shouldn’t be necessary and turned out to have subtle bugs that would do things like drop paypal emails on the floor. And it all started because spamhaus put the entirety of slicehost into a policy block list. Slicehost is a virtual machine provider where people tend to start up a machine and leave it running, doing long term businessy or useful stuff until the need arises for something bigger. That’s ok, except that mail comes into my slice, then gets forwarded to a place that uses that policy black list. PITA really.
And after all the effort to go through and fix that, now I needed to update that slice from oldstable to current debian stable because clamav (the virus scanner) basically blew up on an update and wouldn’t run in daemon mode. So, it forks a process for each incoming mail, which kills the performance and makes Slicehost send me nasty emails about swapping and heavy disk access. So, I need two things: currentish code and updates and more memory. And the best way to add memory is to use less of it. And the image size of the programs that I’m using is a lot smaller (1/2-1/3) in the 32 bit distribution vs the 64 bit distribution. This is something that other people have noted with Slicehost vs other virtual private server providers.
So, Upgrading Etch (x64) to Lenny (i386). Or shall I say, how to install 32 bit Lenny on a 64 bit slice. The adventurous could likely do this on one slice, I’m building a new one so that I don’t kill services while I twiddle with things. There’s a really useful wiki article that covers the majority of what needs to happen. The only real changes are to use arch=i386 in the debootstrap command, and make sure that lenny is the distribution that you select anywhere there’s an etch in that article. Also, you need to delete the existing lib64 directory when you blow away the initial install.
After that, the important bits of making athe mail server play nice include merging all the old configs, which basically works. The Clamav user needs to be added to the amavisd group and clamav-daemon restarted. I also had to set rw permissions on /dev/null for everyone, I’m not sure if that’s a bug in the udev bits or in the copying of the devs over to the new system.
If I need more memory, I may move the one website off that machine and onto Dreamhost, as I see that they have started doing WSGI now, and that would make it reasonably easy to host this pylons site.
(edit: and then, just to make sure that I was paying attention, Dreamhost decided to deliver additional copies of all email in my pop account every time I checked starting 24 hours after I did this.)
No commentsRandom Linkage
An Open Tab Link Dump:
– An easy way to do all the steps required to get a well behaved unix daemon in python.
– Atlas Shrugged, Revisited
– Useful Emacs Commands
– Python mail server. Looks like similar intentions to something I did about 10 years ago and launched my programming career.
– MIT Course Notes on database systems. Something to read in spare time.
Fun with SWIG, wxPython, and the Windows event system
One of the things that I do at the day job is write support for various models of check scanners into our scanning application. It’s a python app, running on Windows using wxPython for the interface. And the one constant in the whole thing is that no two scanners work alike, connect similarly, or have remotely similar APIs. So far, I’ve done:
– Serial
– Serial protocol over Ethernet
– XML over HTTP
– COM Based
– COM Based with Event Callbacks
– SWIGified dll interface
– SWIGified dll interface, with Event Messages
The last scanner that I worked on (which shall go unnamed due to NDA (and really, it’s a published API. Why an NDA? (It’s not like people developing for your scanner wouldn’t like it if everyone copied the same interface))) was the most involved so far, at least to the point of getting the first image out of it. After that, it actually was pretty simple. (And to be fair, there is something called the Ranger API, which does support a good number of scanners, but not all of the ones that we’re interested in. It’s up there, under COM with event callbacks).
Step 1: Getting a SWIG wrapper of the dll to compile using Visual Studio .NET 2003. I’m using VS.net 2003 since I have to stay with what compiled Python 2.4. So, it’s not modern, but it works for what I need it to do. There are a lot of little bits to getting a working SWIG wrapper, especially with debug mode. I gave up on a full debug version of this one due to the difficulty of building a debug version of wxWindows/wxPython on top of all the other python modules that I’d need. First thing is to download SWIG and any other dependencies. I’m on the 1.3 tree of SWIG, later versions may differ. You need to start with a dll project, add the appropriate headers and whatnot. The python libraries and the driver libraries need to be available for linking, the output needs to be put in a \_{module}.pyd file (or
\_{module}\_d.pyd for the debug version). There needs to be a SWIG .i interface file with a custom build step of:
swig.exe -python -o “$(ProjectDir)\$(InputName)_wrap.cxx” “$(InputPath)”
with an output of “$(ProjectDir)\$(InputName)_wrap.cxx”
A minimal .i file for wrapping a windows dll:
%module XVX
%{
/* Includes the header in the wrapper code */
#include “stdafx.h”
#include “XXinterface.h”
%}
/* Parse the header file to generate wrappers */
%include
%include “XXinterface.h”
This .i should swigify and compile, but is not the most useful thing in the world. I had trouble linking, even though all the files to be linked were available. I finally tracked it down to the calling convention — where the last SWIG dll wrapper I made used fastcall, this one required cdecl.
Step 2: Getting a usable hWnd reference from wxPython to a SWIG wrapper so that it worked. The window handle as returned from wxPython’s window.GetHandle() is a python int, which SWIG doesn’t like to automatically convert to a hWnd. So, there’s a little typemap magic in the swig interface file to take that Python integer and turn it into something usable.
/* handle hwnds */
%typemap(in) (HWND Handle) {
$1 = (HWND) ((int)PyInt_AsLong($input));
}
It’s a little ganky in that I’m taking a random integer and making it a window handle, but looking at all the typedefs, I’m pretty sure that it’s a valid approach. What I’m not 100% sure of is if this will work on 64bit machines. I reserve the right to revisit this when I have a 64bit test machine with dev tools.
Step 3: Hooking the Event system so that we could catch ON_MESSAGE events.
The sample code I have is for a MFC C++ app, and it has a message map:
BEGIN_MESSAGE_MAP()
ON_MESSAGE(CUSTOM_EVENT,myHandler),
…
END_MESSAGE_MAP()
It turns out that while wxWindows/wxPython does get most events (mouse, command, menu, etc) and allow them to be handled by registering a handler, the ON_MESSAGE event is not one of them. The messages come into the application through a WndProc. The only reference I found in google for this was a faq page which references a MSWWindowProc that you have to override. That didn’t appear to work, which led to this list message (which is archived at a few places on the web, but on devshed.com, it doesn’t have the all important link to the answer) that links to code for overriding the WndProc and getting all the messages that you need. Once you have that, it’s a simple matter of filtering for the message type sent by the driver.
Step 4: Fleshing out the SWIG interface so that it’s not quite as painful to use. There are a lot of methods that pass back short strings in a buffer that you provide. That’s easily handled using a typemap pair in the .i file. This fragment will take the char* outString, BYTE MaxLen pair, wherever they appear, and drop them from the required python arguments of the function, and append them to the result. It could be a bit better, in that it returns all 255 characters from the buffer and it returns an array of [boolean, string] to python. I’m still working on a fix for that.
/* handle the strings */
%typemap(in,numinputs=0) (char* outString, BYTE MaxLen)(char s[255]) {
$1 = s;
$2 = 255;
}
%typemap(argout) (char* outString, BYTE MaxLen){
$result = SWIG_Python_AppendOutput($result, SWIG_FromCharPtrAndSize($1,$2));
}
I tend to target named parameters, rather than target any type combination like char*, BYTE. It’s easy enough to apply this to other names:
%apply (char* outString, BYTE MaxLen) { (char* ErrorString, BYTE MaxLen) };
Next, the ON_MESSAGE event has two parameters, a message and one that’s either a pointer or an int. Since that pointer is delivered directly to python without being able to typemap it to something else, I’ve added a couple of convenience methods for getting the contents of that pointer. (without pulling ctypes into it) The typemap does something similar to the hWnd typemap above, and the inline function just returns my input, but SWIG will take that pointer and turn it into the python representation of that structure.
%typemap(in) (ImagesStruct *pImageStruct) {
$1 = (ImagesStruct *) PyInt_AsLong($input);
}
%inline %{
ImagesStruct * WINAPI _GetImageStruct(ImagesStruct *pImageStruct ) {
return pImageStruct;
}
%}
Updating Ubuntu, Part 2
I’ve also just updated another one of my ubuntu machines, the netbook, to the latest 9.04 netbook remix that was released yesterday. It had been running an 8.10 eeebuntu release that had some issues. It’s main issue was that it didn’t like waking up from suspend with the GIU intact. Normally, it required killing X and restarting it, which is about as disruptive to working as rebooting the whole machine.
This time, I didn’t bother with an update, it was a clean install on a different SD card. That makes it easy to go back to the previous install by rebooting ad switching the cards. Though, it meant I had to spend another $12 for an 8 gig card.
It appears that all the hardware of my 901 is recognized: the wifi, ethernet, camera, bluetooth, and the USB760 3g dongle. (though, I still have to do a little patch to prevent the dongle from showing up as a drive first). And, most importantly, the suspend and resume sleeping works again.
I could still go into the many ways that this netbook is not an apple product, and I still probably will. But, it does web, email, and ssh, with the occasional reboots into windows to deal with windows specific work stuff.
No comments